Issue with Data Export Service Add-ons


In one of requirement, we wanted to use CRM Data for reporting purpose but due to some limitation with FetchXml (like N-N relationship) we were unable to get desire data so we decided to use Data Export Service Add-ons to push into Azure and make use of data for reporting purpose.

When we tried to install/Enable the Data Export Service from Dynamics Marketplace, the add-on installed successfully without any error but when we tried browse Data Export Service(Settings -> Data Export), it was showing blank page and Data Export Profile page was not displaying at all in IE 11 as below.

We raised ticket to Microsoft and they suggested to add below URL in IE trusted site list and once we added these sites in trusted site, we were able to see Data Export Profile page(Settings->Data Export) as shown below.
https://*.azure.net
https://*.crm.dynamics.com
https://*.microsoftonline.com
https://*.windows.net

Note: In Google Chrome , It was working fine even without adding above URLs in trusted sites.

Hope this will help someone.

Associate a Security Role on User Creation in CRM 2011 using Async Plugin


Below is the sample code to associate a security role on user creation in CRM 2011. Register the plugin on Post Create of systemuser entity and select execution mode as Asynchronous


public void Execute(IServiceProvider serviceProvider)

        {

            // Obtain the execution context from the service provider.

            IPluginExecutionContext context =

                (IPluginExecutionContext)serviceProvider.GetService(typeof(IPluginExecutionContext));


            // Get a reference to the organization service.

            IOrganizationServiceFactory factory =

                (IOrganizationServiceFactory)serviceProvider.GetService(typeof(IOrganizationServiceFactory));

            IOrganizationService service = factory.CreateOrganizationService(context.UserId);


// The InputParameters collection contains all the data passed in the message request.

            if (context.InputParameters.Contains(“Target”) &&

                context.InputParameters[“Target”] is Entity)

            {

                // Obtain the target entity from the input parameters.

                Entity entity = (Entity)context.InputParameters[“Target”];


                // Verify that the target entity represents a systemuser.

                // If not, this plug-in was not registered correctly.

                if (entity.LogicalName != “systemuser”)

                    return;


            try

            {

// get user entity record id

Guid userId=(Guid)context.OutputParameters[“id”];


//Get Id of Security Role

Guid securityRoleId=new Guid(“<enter guid here>”)

                // Create the request object

// systemusersroles_association relationship.

AssociateRequest addRolesToUser = new AssociateRequest

{

    Target = new EntityReference(“systemuser”, userId),

    RelatedEntities = new EntityReferenceCollection

    {

        new EntityReference(“role”, securityRoleId)

    },

    Relationship = new Relationship(“systemuserroles_association”)

};


// Execute the request.

service.Execute(addRolesToUser);

            }

            catch (FaultException<OrganizationServiceFault> ex)

            {

                // Handle the exception.

            }

        }

}

 hope it will help u !

Retrieve Related entity’s field value from client side using oData


Below is the sample of how to retrieve related entity’s field value using oData.

Let’s take a example ..suppose we want to retrieve some field value from SystemUser entity(User Name and EmployeeId) OnLoad of Account where OwnerId of Account is equal to SystemUserId of SystemUser entity.Write below  code on OnLoad of Account entity.

var serverUrl=Xrm.Page.context.getServerUrl();
var ownerId=Xrm.Page.getAttribute(“ownerid”).getValue()[0].id;
var ownerGuid=ownerId.substring(1,ownerId.length-1);

var oDataQuery=serverUrl+”/xrmservices/2011/OrganizationData.svc/SystemUserSet?$select=DomainName,EmployeeId,ParentSystemUserId,AccessMode&$expand=user_accounts&$filter=SystemUserId eq guid'”+ownerGuid+”‘”;

$.ajax(

{
type: “GET”,
contentType: “application/json; charset=utf-8”,
datatype: “json”,
url: oDataQuery,
beforeSend: function(XMLHttpRequest)
{
XMLHttpRequest.setRequestHeader(“Accept”,”application/json”);
},
success: function(data, textStatus, XmlHttpRequest)
{
if(data != null && data.d != null && data.d !=null)
{
var users=data.d.results[0];
var userName=users.DomainName;

//Lookup Manager(ParentSystemUserId)
var managerName=users.ParentSystemUserId.Name;
var managerId= users.ParentSystemUserId.Id;
var managerType=users.ParentSystemUserId.LogicalName;

// OptionSet
var accessMode=users.AccessMode.Value // This will return integer value

var employeeId=users.EmployeeId;
alert(‘User Name : ‘+users.DomainName +’Employee Id :’ +users.EmployeeId);
}
},
error: function(XmlHttpRequest,textStatus,errorThrown)
{
alert(‘oData select failed ‘+ oDataQuery);
}
}
);

Note : don’t forget to load json2.js and jquery1.4.1.min.js  framework on Account Form.

Hope it will help u.

Create CRM records using REST endpoint with Silverlight


The sample will explain …

1. how to perform basic operation Create CRM records using REST endpoint
2. Display the result( created record ) by adding Silverlight web resource(.XAP file) on entity form.

Step 1: Create Silverlight Application project in Visual Studio 2010

Create a Silverlight project in Visual Studio 2010. Follow the following steps to create Silverlight Application

1. Start -> Visual Studio 2010 -> New -> Project ->Silverlight Template -> Silverlight Application
2. Enter name of the Solution as “SilverlightWithCRM2011” and click “OK”.
3.  Select the option selected in below image.
SilverlightApplication_Host

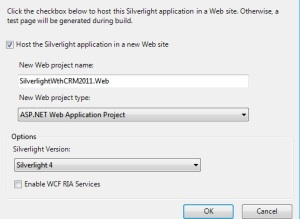
Keep the option checked  “Host the Silverlight application in a new Web site”

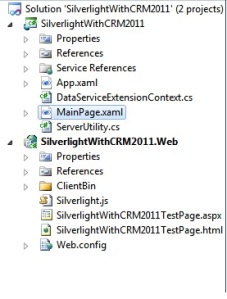
4. Click on “Ok” to create the Silverlight Application Project which will be similar to below.
SilverlightApplication

Step 2: Generate the WCF Data Services Client Data Service Class

  1. In Microsoft Dynamics CRM 2011 navigate to Settings. Choose Customizations and then Developer Resources.
  2. Under Service Endpoints, click the Download CSDL link and save the OrganizationData.csdl file to your computer.
  3. In your Visual Studio 2010 Silverlight application project, right-click References, and then click Add Service Reference.
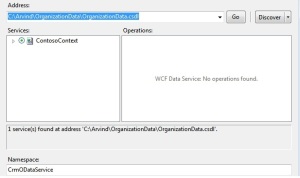
  4. Type the path of the location where you saved the OrganizationData.csdl file in step 2, and then click Go.

Enter an appropriate CrmODataService and then click OK. Below is the sample image.
AddServiceReference

Step 3: Modify the SilverlightWithCRM2011TestPage.html

Modify three lines of auto generated SilverlightWithCRM2011TestPage.html page

1.            The #silverlightControlHost style width is set to 100%.
2.            The script reference to the Silverlight.js file is commented out (or removed). This will be             provided by Microsoft Dynamics CRM.
3.            A script reference to ../ClientGlobalContext.js.aspx was added. This provides access to a                                              context object that is accessed from the code within MainPage.xaml.cs.

Step 4: Add ServiceUtility.cs file into Silverlight application

This static class will provides the functions to retrieve the Server URL. Below is the sample code of ServiceUtility.cs file
using System;
using System.Windows.Browser;
namespace SilverlightWithCRM2011
{
public static class ServerUtility
{
/// <summary>
/// Returns the ServerUrl from Microsoft Dynamics CRM
/// </summary>
/// <returns>String representing the ServerUrl or String.Empty if not found.</returns>
public static String GetServerUrl()
{
String serverUrl = String.Empty;
//Try to get the ServerUrl from the Xrm.Page object
serverUrl = GetServerUrlFromContext();
return serverUrl;
}
/// <summary>
/// Attempts to retrieve the ServerUrl from the Xrm.Page object
/// </summary>
/// <returns></returns>
private static String GetServerUrlFromContext()
{
try
{
// If the Silverlight is in a form, this will get the server url
ScriptObject xrm = (ScriptObject)HtmlPage.Window.GetProperty(“Xrm”);
ScriptObject page = (ScriptObject)xrm.GetProperty(“Page”);
ScriptObject pageContext = (ScriptObject)page.GetProperty(“context”);
String serverUrl = (String)pageContext.Invoke(“getServerUrl”);

//The trailing forward slash character from CRM Online needs to be removed.
if (serverUrl.EndsWith(“/”))
{
serverUrl = serverUrl.Substring(0, serverUrl.Length – 1);
}

return serverUrl;
}
catch
{
return String.Empty;
}
}
}
}

Step 5: Implement DataServiceContextExtension.cs file

The WCF data services client data service classes can cause some undesirable behavior when records are updated. All properties of the record are updated regardless of whether they are changed or not. Furthermore, if an entity is instantiated rather than being retrieved, any properties not set in code will be null. These null values overwrite any existing values for the record. To avoid these issues, do the following steps

using System;
using System.Linq;
using System.Data.Services.Client;
using System.Reflection;
using System.Collections.Generic;
using System.ComponentModel;
using System.Collections.ObjectModel;
using System.Xml.Linq;
using SilverlightWithCRM2011.CrmODataService;
namespace SilverlightWithCRM2011.CrmODataService
{
partial class ContosoContext
{
#region Methods
partial void OnContextCreated()
{
this.ReadingEntity += this.OnReadingEntity;
this.WritingEntity += this.OnWritingEntity;
}
#endregion

#region Event Handlers
private void OnReadingEntity(object sender, ReadingWritingEntityEventArgs e)
{

                                                ODataEntity entity = e.Entity as ODataEntity;
if (null == entity)
{
return;
}

entity.ClearChangedProperties();
}

private void OnWritingEntity(object sender, ReadingWritingEntityEventArgs e)
{
ODataEntity entity = e.Entity as ODataEntity;
if (null == entity)
{

                                                                return;
}

entity.RemoveUnchangedProperties(e.Data);
entity.ClearChangedProperties();
}
#endregion
}

public abstract class ODataEntity
{
private readonly Collection<string> ChangedProperties = new Collection<string>();
public ODataEntity()

                                {
EventInfo info = this.GetType().GetEvent(“PropertyChanged”);
if (null != info)
{
PropertyChangedEventHandler method = new PropertyChangedEventHandler
this.OnEntityPropertyChanged);

//Ensure that the method is not attached and reattach it
info.RemoveEventHandler(this, method);
info.AddEventHandler(this, method);
}
}

#region Methods

                                public void ClearChangedProperties()
{
this.ChangedProperties.Clear();
}

internal void RemoveUnchangedProperties(XElement element)

{
const string AtomNamespace = “http://www.w3.org/2005/Atom&#8221;;
const string DataServicesNamespace =
http://schemas.microsoft.com/ado/2007/08/dataservices&#8221;;
const string DataServicesMetadataNamespace = DataServicesNamespace + “/metadata”;
if (null == element)
{
throw new ArgumentNullException(“element”);
}

List<XElement> properties = (from c in element.Elements(XName.Get(“content”,
tomNamespace)
).Elements
XName.Get(“properties”, DataServicesMetadataNamespace)).Elements()
select c).ToList();
foreach (XElement property in properties)
{
if (!this.ChangedProperties.Contains(property.Name.LocalName))
{

property.Remove();
}
}
}

private void OnEntityPropertyChanged(object sender,
ystem.ComponentModel.PropertyChangedEventArgs e)
{
if (!this.ChangedProperties.Contains(e.PropertyName))
{
this.ChangedProperties.Add(e.PropertyName);
}
}
#endregion
}
}
For reference, please visit the below URL
http://msdn.microsoft.com/en-in/library/7a31d077-2f18-47d7-8631-
a711717d02a#BKMK_GenerateWCFDataServicesClientClasses

Step 6: Edit the MainPage.xaml file as below

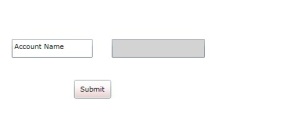
Just added two TextBox and a button to default MainPage.xaml
<UserControl x:Class=”SilverlightWithCRM2011.MainPage”
xmlns=http://schemas.microsoft.com/winfx/2006/xaml/presentation    xmlns:x=http://schemas.microsoft.com/winfx/2006/xaml    xmlns:d=http://schemas.microsoft.com/expression/blend/2008    xmlns:mc=”http://schemas.openxmlformats.org/markup-compatibility/2006&#8243;
mc:Ignorable=”d”
d:DesignHeight=”300″ d:DesignWidth=”400″>
<Grid x:Name=”LayoutRoot” Background=”White”>
<StackPanel x:Name =”MessagePanel” VerticalAlignment=”Top”/>
<TextBox Name=”lblAccountName” Height=”30″ Width=”130″ Background=”White”
lowDirection=”LeftToRight” TextAlignment=”Left” Margin=”47,110,212,160″ Text=”Account Name”></TextBox>
<TextBox Name=”txtAccountName” Height=”30″ Width=”150″ Background=”LightGray”   FlowDirection=”LeftToRight” TextAlignment=”Left” Margin=”214,110,36,160″></TextBox>

        <Button Name=”btnSubmit” Click=”btnSubmit_Click” Background=”Brown” Height=”30″ Width=”60″ DataContext=”{Binding}” Content=”Submit” Margin=”153,176,187,94″></Button>
</Grid>
</UserControl>

Step 7: Edit the MainPage.xaml .cs file as below

using System;
using System.Collections.Generic;
using System.Linq;
using System.Net;
using System.Windows;
using System.Windows.Controls;
using System.Windows.Documents;
using System.Windows.Input;
using System.Windows.Media;
using System.Windows.Media.Animation;
using System.Windows.Shapes;
using SilverlightWithCRM2011.CrmODataService;
using System.Threading;

namespace SilverlightWithCRM2011
{
public partial class MainPage : UserControl
{
private SynchronizationContext _syncContext;
private ContosoContext _context;
private String _serverUrl;

public MainPage()
{
InitializeComponent();

}

/// <summary>
/// Creates an Account record in CRM.
/// </summary>
private void BeginCreateAccount()
{
Account newAccount = new Account();
newAccount.Name = txtAccountName.Text;
_context.AddToAccountSet(newAccount);
_context.BeginSaveChanges(OnCreateAccountComplete, newAccount);
}

/// <summary>
/// Callback method invoked when Account is done being created.
/// </summary>
/// <param name=”result”></param>
private void OnCreateAccountComplete(IAsyncResult result)
{
try
{
_context.EndSaveChanges(result);
Account createdAccount = result.AsyncState as Account;
MessagePanel.Children.Add(new TextBlock()
{
Text = String.Format(“Created a new account named \”{0}\”\n\twith AccountId = \”{1}\”.”,
createdAccount.Name, createdAccount.AccountId)
});

//Retrieve the Account just created.
// BeginRetrieveAccount(createdAccount.AccountId);
}
catch (SystemException se)
{
_syncContext.Send(new SendOrPostCallback(showErrorDetails), se);
}
}

/// <summary>
/// Will display exception details if an exception is caught.
/// </summary>
/// <param name=”ex”>An System.Exception object</param>
private void showErrorDetails(object ex)
{
//Assure the control is visible
MessagePanel.Visibility = System.Windows.Visibility.Visible;

Exception exception = (Exception)ex;
String type = exception.GetType().ToString();

MessagePanel.Children.Add(new TextBlock()
{
Text =
String.Format(“{0} Message: {1}”, type, exception.Message)
});

MessagePanel.Children.Add(new TextBlock()
{
Text =
String.Format(“Stack: {0}”, exception.StackTrace)
});

if (exception.InnerException != null)
{
String exceptType = exception.InnerException.GetType().ToString();
MessagePanel.Children.Add(new TextBlock()
{
Text =
String.Format(“InnerException: {0} : {1}”, exceptType,
exception.InnerException.Message)
});
}
}

private void btnSubmit_Click(object sender, RoutedEventArgs e)
{
//Keeps a reference to the UI thread
_syncContext = SynchronizationContext.Current;

//Get the ServerUrl (ServerUrl is formatted differently OnPremise than OnLine)
_serverUrl = ServerUtility.GetServerUrl();

if (!String.IsNullOrEmpty(_serverUrl))
{

//Setup Context
_context = new ContosoContext(
new Uri(String.Format(“{0}/xrmservices/2011/organizationdata.svc/”,

_serverUrl), UriKind.Absolute));

//This is important because if the entity has new
//attributes added the code will fail.
_context.IgnoreMissingProperties = true;

MessagePanel.Children.Add(new TextBlock()
{
Text = “Starting Create Operation.”
});

//Begin the Create, Retrieve, Update, and Delete operations. The operations are chained together
//as each of them is completed.
BeginCreateAccount();
}
else
{
//No ServerUrl was found. Display message.
MessagePanel.Children.Add(new TextBlock()
{
Text =
“Unable to access server url. Launch this Silverlight ” +
“Web Resource from a CRM Form OR host it in a valid ” +
“HTML Web Resource with a ” +
“<script src=’../ClientGlobalContext.js.aspx’ ” +
“type=’text/javascript’></script>”
});
}

}

}
}

Step 8: Now Compile the SilverLight Application Solution

Both project in solution should be build successfully. Now take SilverlightWithCRM2011.xap and SilverlightWithCRM2011TestPage.html and create two Web Resource of type XAP and HTML respectively.

Give the proper name of the Web Resource as below.

1. avs_/SilverlightWithCrm2011TestPage.html

An HTML page can be used to view the Silverlight control outside a form. The only purpose of this web resource is to provide the URL of the server when the Microsoft Silverlight control cannot access it itself through the Xrm.Page.context.getServerUrl when the Silverlight web resource is added in an entity form.

2. avs_/ClientBin/SilverlightWithCRM2011.xap

The name of this web resource just reflects the relative output location of the .xap file in the Microsoft Visual Studio 2010 Silverlight application (version 4) project.

Now publish the both Web Resource

Note: avs_ is the publisher customization prefix

Step 9: Add SilverlightWithCRM2011 web Resource on any entity Form

The Silverlight Application UI looks like below.

SilverlightUI

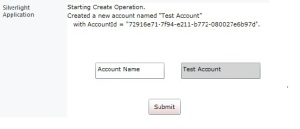
Step 10: Enter the Account Name and Click on Submit

It will give the output similar to below.

FinalOutput

I hope this will help you 🙂

Share Entity record with Team


          Below is the sample code to share entity record with team in MS CRM 2011

            var teamReference = new EntityReference(“team”, teamId);
            var grantAccessRequest = new GrantAccessRequest
            {
                PrincipalAccess = new PrincipalAccess
                {
                    AccessMask=AccessRights.ReadAccess | AccessRights.WriteAccess,        
                    Principal=teamReference
                },

                Target=new EntityReference(“lead”,recordId)

            };
            service.Execute(grantAccessRequest);

           // Get teamId from below function

private Guid GetTeamId(string teamName,OrganizationService service)
        {
            Guid teamId=Guid.Empty;
            QueryByAttribute query = new QueryByAttribute();
            ColumnSet cols = new ColumnSet();
            cols.AddColumn(“teamid”); 

            query.ColumnSet = cols;
            query.AddAttributeValue(“name”, teamName);
            query.EntityName = “team”; 

            EntityCollection entityCollection = (EntityCollection)service.RetrieveMultiple(query);              
            if (entityCollection.Entities.Count > 0)
            {
                    Entity entity =entityCollection.Entities[0];
                    teamId = entity.Id;
            }
            return teamId;          

        }

I have already posted the same for CRM 4.0. Please find the reference link below.
https://arvindcsit.wordpress.com/2012/02/26/create-contact-and-share-the-record-which-contains-lookuppicklist-and-string-datatype/


Populate OptionSet value from MS CRM 2011 into DropDownList in ASP.NET


We had a requirement to create CRM record from custom ASP.NET page. There was an OptionSet on CRM Form which we need to display the option value in DropDownList of ASP.NET page. Below is the sample code to populate OptionSet value into DropDownList.

// Create Dictionary object to store the OptonSet value.
Dictionary<int, string> dropDownSource = new Dictionary<int, string>();

// Create Retrieve reuest
RetrieveAttributeRequest optionSetRequest = new RetrieveAttributeRequest();
optionSetRequest.EntityLogicalName = “lead”;
optionSetRequest.LogicalName = “leadqualitycode”;
optionSetRequest.RetrieveAsIfPublished = true;

RetrieveAttributeResponse optionSetResponse = (RetrieveAttributeResponse)service.Execute(optionSetRequest);

// Access retrive metadata

PicklistAttributeMetadata retrieveOptionSetMetadata = (PicklistAttributeMetadata)optionSetResponse.AttributeMetadata;

//get current optionlist for attribute

OptionMetadata[] optionList = retrieveOptionSetMetadata.OptionSet.Options.ToArray();

foreach (OptionMetadata o in optionList)
{
dropDownSource.Add(int.Parse(o.Value.ToString()), o.Label.UserLocalizedLabel.Label.ToString());
}

// ddlRating is object of dropdownlist
ddlRating.DataSource = dropDownSource;
ddlRating.DataBind();

Connect To Organization Web service in MS CRM 2011


Provide the connection to the server using a connection string. You can find the CrmConnection class in namespace Microsoft.Xrm.Client and dll (Microsoft.Xrm.Client.dll which is avaialbale in sdk/bin folder)

//The following example shows the connection string using Active Directory authentication:

Microsoft.Xrm.Client.CrmConnection connection = CrmConnection.Parse(“Url=http://<Crm Server>/<Orgnization Name>;Domain=<contoso>;Username= Abc;Password=Abc;”);

// Create object of Organization Service

OrganizationService service  = new OrganizationService(connection);

Entity entity = new Entity(“lead”);
entity[“subject”] = “Test”;
entity[“firstname”] = “Arvind”;
entity[“lastname”] = “Singh”;
Guid leadId = service.Create(entity);

For details, please go through below link
http://msdn.microsoft.com/en-in/library/gg695810.aspx

hope it helps..


Calling EXE or Executing command from CRM 2011 Ribbon button

I had a requirement to execute command or call exe file from CRM Ribbon button which open SAP GUI shortcut based on some parameter which we need to pass as  parameter  from CRM Entity Form. We had written the following function which was called from CRM button.

function CallSAPGUI(l_SAPID)
 {
    var l_c_ConvertToCharCode = String.fromCharCode(34);
var obj_ActiveX = new ActiveXObject(‘WScript.Shell’);

l_s_CommendText = ‘start sapshcut.exe’ + ‘ -user=’ + l_c_ConvertToCharCode + l_SAPID + l_c_ConvertToCharCode + ‘ -client=017’ + ‘ -language=EN’ + ‘ -system=ABC’ + ‘ -gui=/M/vhdh08.ct056.tss.loc/S/3600/G/ct_01’ + ‘ -command=*/TTC/ZZ_PP_RAT_TA3/CLA/ZZ_PP_TARHD-NUM=1000-34;’ + ‘ –maxgui’;

 if (obj_ActiveX)
{
obj_ActiveX.Run(‘cmd.exe /c ‘ + l_c_ConvertToCharCode + l_s_CommendText + l_c_ConvertToCharCode);
}
}

We were using this code in CRM 2011 outlook client. Once I deployed this code , I thought this code will work but I got the below error.

Automation server can’t create object

I visited various blog and found that we need to do the following setting in IE. We need to do the below setting for both “Local Intranet ” and” Trusted Sites ” of Security Tab. Once i did the browser setting SAP GUI was working fine on button click.

IE_Settings

Hope it will help you !!


Add button in existing group of Ribbon


Let’s say, we want to add a custom button in Activity group of Contact and on click it will open a window to create CustomerVisits (new_customervisit) record which is a custom activity.

Steps:
Follow the below steps to create a button in existing group.
Step #1 Create a new solution say TestSolution.
Step #2 Open newly created TestSolution and the entity on which you want to button.I have added contact entity.
Step #3 Publish All Customization
Step #4 Export the TestSolution for editing.
Step #5 Open customization.xml file from exported solution for editing.
Step #6 Find out RibbonDiffXml tag and replace the code from <RibbonDiffXml> to </RibbonDiffXml>With below code.


<RibbonDiffXml>

<CustomActions>

<CustomAction Id=”CompanyName.Form.contact.Related.Activities.CustomerVisits.CustomAction” Location=”Mscrm.Form.contact.Related.Activities.Controls._children” Sequence=”41″>

<CommandUIDefinition>

<Button Id=”CompanyName.Form.contact.Related.Activities.CustomerVisits” Command=”CompanyName.Form.contact.Related.Activities.CustomerVisits.Command” Sequence=”15″ ToolTipTitle=”$LocLabels:CompanyName.Form.contact.Related.Activities.CustomerVisits.LabelText” LabelText=”$LocLabels:CompanyName.Form.contact.Related.Activities.CustomerVisits.LabelText” ToolTipDescription=”$LocLabels:CompanyName.Form.contact.Related.Activities.CustomerVisits.Description” TemplateAlias=”isv” Image32by32=”http://<crm&gt;:5555/PuneCRMTest/WebResources/new_customerVisits” Image16by16=”http://<crm&gt;:5555/PuneCRMTest/WebResources/new_AppAdd” />

</CommandUIDefinition>

</CustomAction>

</CustomActions>

<Templates>

<RibbonTemplates Id=”Mscrm.Templates”></RibbonTemplates>

</Templates>

<CommandDefinitions>

<CommandDefinition Id=”CompanyName.Form.contact.Related.Activities.CustomerVisits.Command”>

<EnableRules />

<DisplayRules />

<Actions>

<Url Address=”http://<crm&gt;:5555/PuneCRMTest/main.aspx?etn=new_customervisit&amp;pagetype=entityrecord” PassParams=”false” WinParams=”0″ />

</Actions>

</CommandDefinition>

</CommandDefinitions>

<RuleDefinitions>

<TabDisplayRules />

<DisplayRules />

<EnableRules />

</RuleDefinitions>

<LocLabels>

<LocLabel Id=”CompanyName.Form.contact.Related.Activities.CustomerVisits.Description”>

<Titles>

<Title languagecode=”1033″ description=”CustomerVisits Description” />

</Titles>

</LocLabel>

<LocLabel Id=”CompanyName.Form.contact.Related.Activities.CustomerVisits.LabelText”>

<Titles>

<Title languagecode=”1033″ description=”CustomerVisits” />

</Titles>

</LocLabel>

</LocLabels>

</RibbonDiffXml>


Step #7 Save the customization.xml file.
Step #8 Zip the all three files (cutomiztion, solution and [Content_Types]) and import into CRM
Step #9 Remove the contact entity from TestSolution.
Step #10 Delete the solution TestSolution.

Import attachment into MS CRM 2011 entity


Let’s say we want to attach some documents in Contact entity records. We can use out of box Import Data Tool to upload data/attachments into MS CRM 2011.To import attachment into particular record we need to identify a unique key for the record(let’s say for contact entity, it’s contact id i.e. GUID or any field which is unique).

Below is the step by step procedure to import attachment for contact’s record.
Steps:
Prepare Source Data:

Step #1 Go to Data Management ->Templates for Data Import -> Select Note and click on Download.
Step #2 Edit the downloaded template as shown below.
https://arvindcsit.files.wordpress.com/2012/07/sampledata.jpg

Description of Columns:
Title: This would be Title of attached file.
File Name: File name of the attachment.
Mime Type: Type of attachment like text/plain.
Regarding:  Reference of record’s field name. In my case I have selected Contact’s Full Name.
Document: Document Id of attached file.
Owner: Owner name must be the CRM user.
Description: Description of file.

Step #3 Build the folder structure for attachments and data file:
Below are some guidelines for file size and folder structure.

If you want to Import multiple files in one Import session, you can .zip them together. A .zip file can include files of .csv, .xml, or .txt file types. All files in a single compressed file must be of the same file type.

The .zip file must confirm to one of these folder structure:

  • .zip file having the files and optional attachment folder directly in it:-
    • Attachments (Folder)
    • <File1>
    • <File2>
    • <File3>

Note: By default, the maximum size of the files you can import is 8 megabytes (MB). This means:

  • Any .csv, .txt, or .xml file must not exceed 8 MB.
  • Any individual file inside the .zip file must not exceed 8 MB and the total size of the .zip file, including the Attachment folder, must not exceed 32 MB.

You can choose any of the above file formats and give it as an input to the Import Data wizard. The delimited .txt, .csv, or XML Spreadsheet 2003 format files can be easily created by using Microsoft Office Excel.

In my case, I followed this “ZIP folder that contain data files and one Attachment folder directly under root” i.e.

  • ContactImport(Zip file name)
    • Attachments(folder)
    • Note.xml

Step #4 Import the ContactImport.zip file using Import Data feature (Data Management ->Imports).
Step #5 Click Next
Step#6 Select “SampleDataMap” and Click Next.
Step#7 Select “Note” for Microsoft Dynamics CRM Record Types and Click Next.
Step#8 Select mapping fields from CRM Fields as shown below and Click Next.
https://arvindcsit.files.wordpress.com/2012/07/fieldsmapping.jpg
Step#8 Clicks on Next.
Step#9 Select Allow Duplicates “No”  and Click Submit.
You can write Data map Name for future import.
Step#9 Data has been submitted for import. It may take time based on size of data.

Step#10 Please check the contact record for attachment.

%d bloggers like this: